Customer Service Order
Backdoor a Customer Service Order
Included in this article:
- Overview
- Backdoor a Customer Service Order Procedure
1. Overview
Pre-Conversion guests do not carry their purchase history into Storis when TDG takes ownership of the selling location. To gather the required details to create a Customer Service Order and confirm warranty coverage, you will need to have this request verified. Once this is done, we would need to backdoor a CSO to service the guest.
2. Backdoor a Customer Service Order Procedure
Prior to creating a Service Order for the guest, we need to validate their product(s) and its warranty coverage.
Please email Sara-Anne Gatchell with the customer number and product(s) in question. Within 24 hours you will receive an email back with the confirmation details. At that time, you will be able to contact the guest and proceed as per SOP.
If the guest is eligible for service, complete the following steps:
1. go to the Enter a Service Order screen
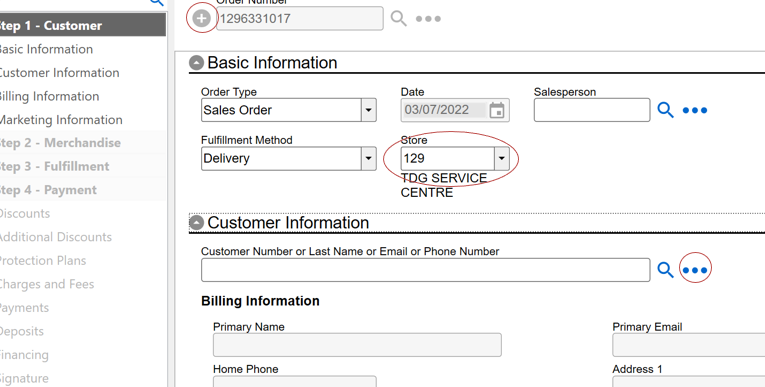
2. Press the green add icon to generate a CSO number
3. From the Store dropdown menu, select 129
4. Select the ellipses (the three dots) beside the Customer Number field. This will open the Search for a Customer screen

5. Select Exit
6. Fill in the following information:
Customer phone number(s). Select from drop down what phone number is being chosen (options below):
o Home
o Work
o Cell
Enter in phone number and press Save.
Note: If you receive a prompt This Phone Number 2049999999 has been used by multiple accounts. Assign this Phone Number to this account?, select Yes.
Continue entering the following details:
Ø Customer first name
Ø Customer last name
Ø Customer address
o Including Postal Code
Ø Click box Delivery Address same as Billing Address
Ø Customers email address
o If no email is provided use: noemail@tdg.com
7. Press Save
8. Enter 55NA as the Salesperson code
9. Scroll down and ensure Service Location is correct
o 885 – GTA
o 777 – Calgary
o 866 – Edmonton
o 888 – Winnipeg
o 883 – Saskatchewan
10. Enter store number in the Original Order field.
o Say Yes to the prompt
11. Enter in Coordinator Code
12. Click on the Merchandise Tab
13. Enter item number into Product field
14. Enter Problem Code and press tab
o MFG = Manufacture warranty
o PPP – Extended Warranty
o TDG – TDG caused damage
o CST – Customer to pay for service
15. In Add Text box, enter detailed description of the issue/defect. Also include
o Part Numbers
o Serial Numbers
16. Press OK
17. Enter in Service Status
o CC – Call Customer
o SCH – Internal Technician Scheduled
o ACD – Third Party (Cleaning or Appliances)
o COP – Customer Owned Pending
o COG – Customer Owned Goods
o HDP – Home Damage
o EXC – Exchange
o PTS – Parts on Order
18. In Purchase Date field, enter in date of possession
19. Press Save
20. Go to the Labor tab
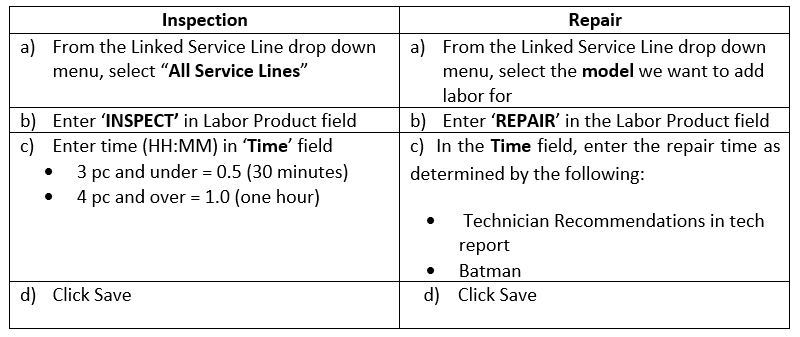
21. Determine if the technician is going out to inspect or repair the items and follow the dependent stream below:

Note: When box pops up, double click the line of the item you are wanting to input the charges to.
22. Enter in labor charges
23. Press Save
24. Go to Customer tab, scroll down to Service Date. In here, select any date.
o If no available dates change Status to Pending
25. In Next Date field, enter the tickle date
o Review tickle date sheet to determine what day should be selected
26. Go to Actions and select Audit Comments Log.
27. Select Update Comments
o Enter detailed notes about your conversation with guest
28. Press Save
29. Press Exit
30. Press Save
31. Press Save
Was this article helpful?


